3. Creating and Saving Networks
There are 2 different ways of creating networks in Cytoscape Web:
Opening pre-existing networks from the Network Data Exchange (NDEx) public database.
Importing unformatted tabular text files.
3.1. Open Network from NDEx
The NDEx Project provides an open-source framework where scientists and organizations can share, store, manipulate, and publish biological network knowledge.
To import a network from NDEx, choose Data → Open Network(s) from NDEx in the top menu bar:
The NDEx Network Browser window will open in the SEARCH NDEx tab allowing you to browse all the available public networks sorted by date last modified.
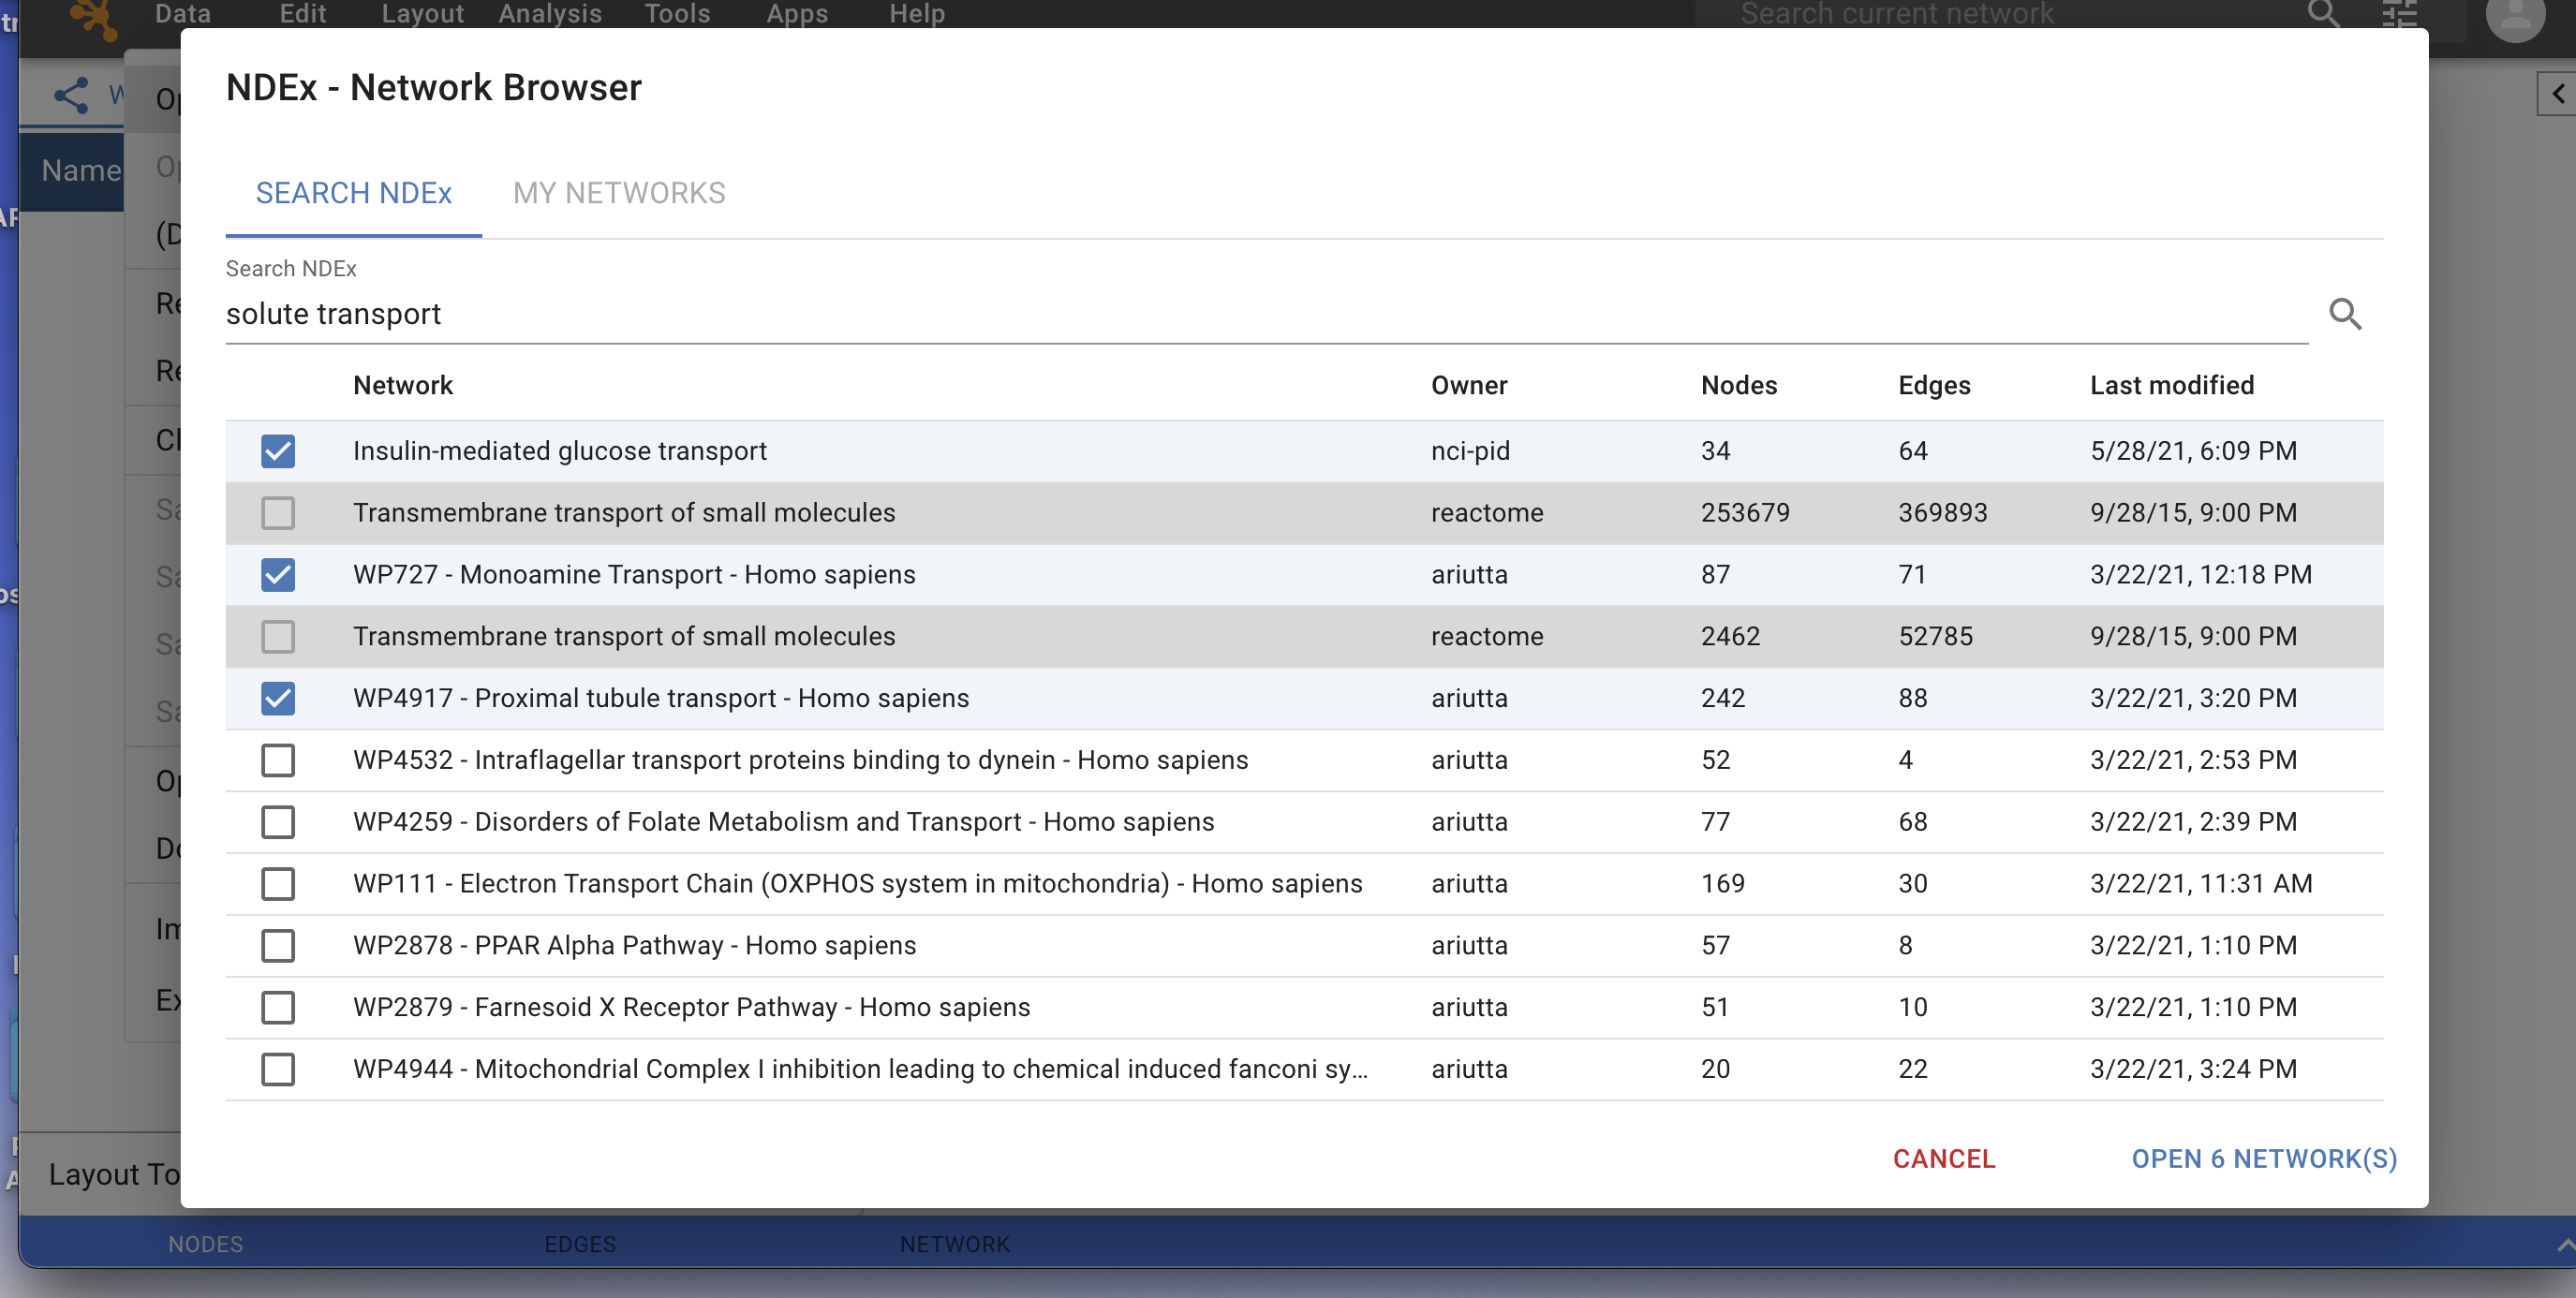
You can find networks of interest by typing one or more search terms in the search bar (such as BRCA1, Apoptosis etc), and then clicking the
 button to search.
BONUS: If you are logged into your NDEx account, you can also select the MY NETWORKS tab and browse or search only among your own networks stored in NDEx.
Search results are always returned in order of relevance based on the search terms you provided.
Networks highlighted in grey cannot be imported, mouse-over for more information.
On the left hand side, mark the checkbox to select the network(s) you want to import.
Click the OPEN NETWORK(S) button in the bottom right corner to import all selected networks.
NOTE: You can also use Data → Open Sample Networks to conveninetly get started with 4 publicly available example networks available in NDEx.
3.2. Open Workspace from NDEx
In Cytoscape Web, the worspace is comparable to the “session” concept in the Cytoscape desktop application. Therefore, a Cytoscape Web workspace can be imported and exported to a user’s NDEx account. This feature is only available to Cytoscape Web users when they are logged into their NDEx accounts.
To import a workspace from NDEx, choose Data → Open Workspace from NDEx… in the top menu bar:
The My Workspaces window will open and display all the available workspaces stored in your NDEx account.
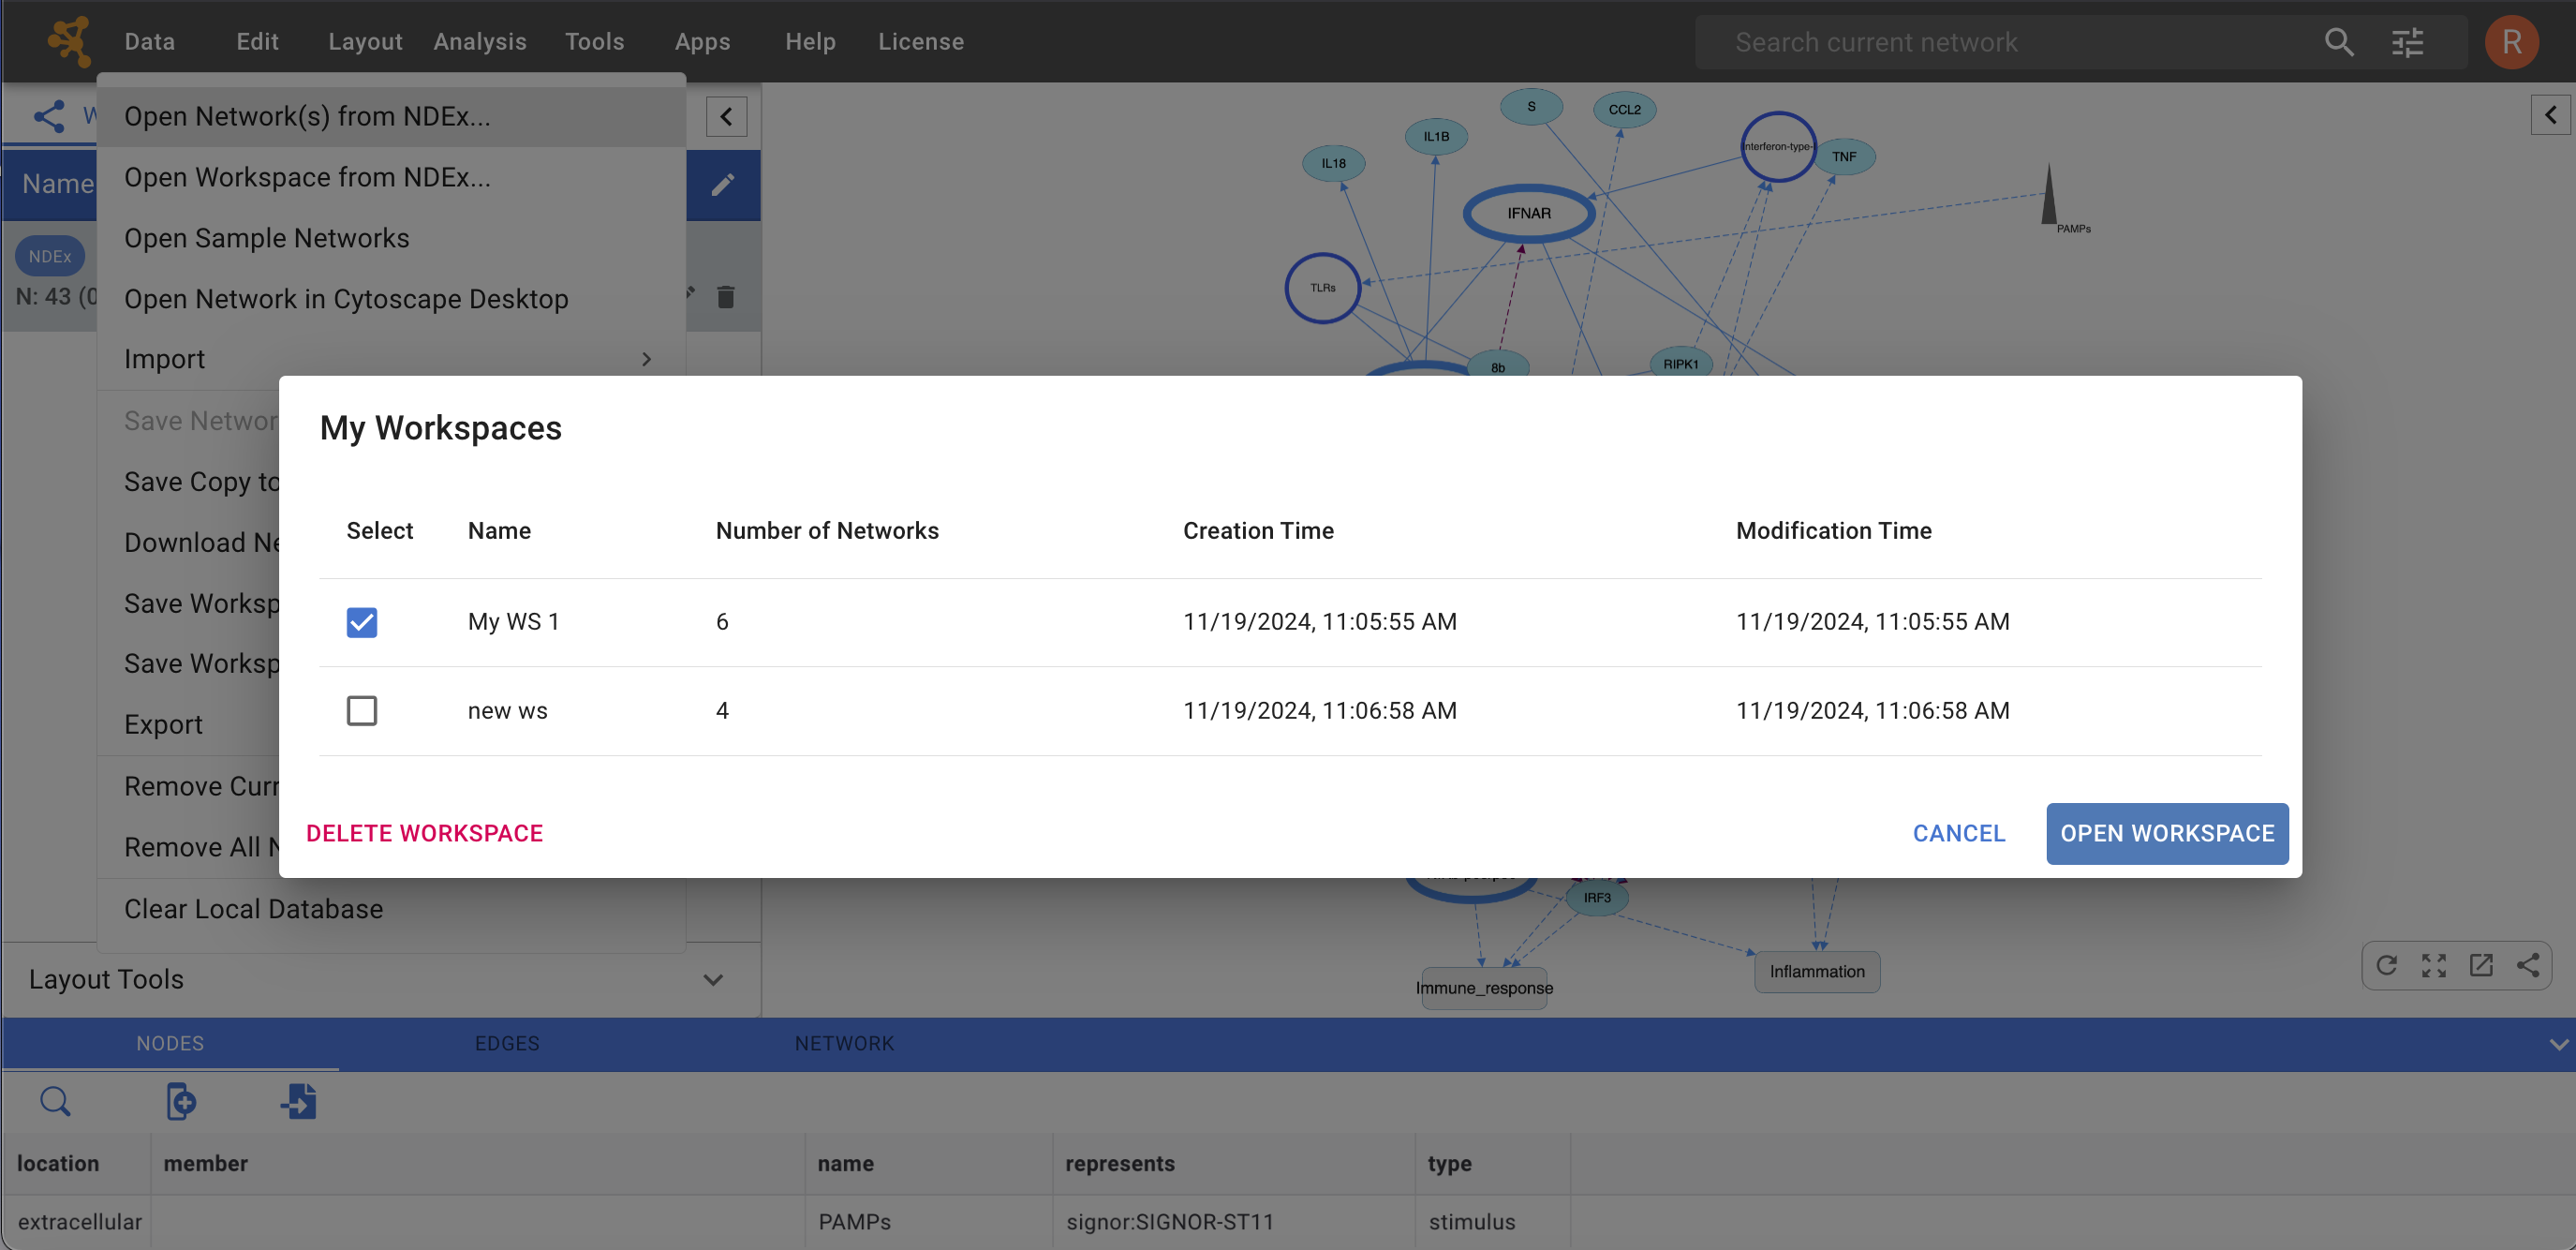
On the left hand side, mark the checkbox to select the workspace you want to import.
Click the OPEN WORKSPACE button in the bottom right corner to import the selected workspace.
You can also DELETE a selected workspace if desired.
3.3. Import Network from File
Cytoscape Web supports the import of networks from delimited text files (.csv, .txt, .tsv, .sif). Cytoscape Web can also import network files in CX2 JSON format (.cx2), wich is also the format used to store them in NDEx.
HINT:
CX2 JSON files can be generated by the Cytoscape desktop application for any networks using File → Export → Network to File…. For more details, please review section 23.1. Raw Data Export of the Cytoscape manual.
CX2 JSON files can be generated by the NDEx2 Python Client
CX2 JSON files can be generated and downloaded by Cytoscape Web for any displayed network.
To import a network from file, choose Data → Import → Network from File… in the toop menu bar.
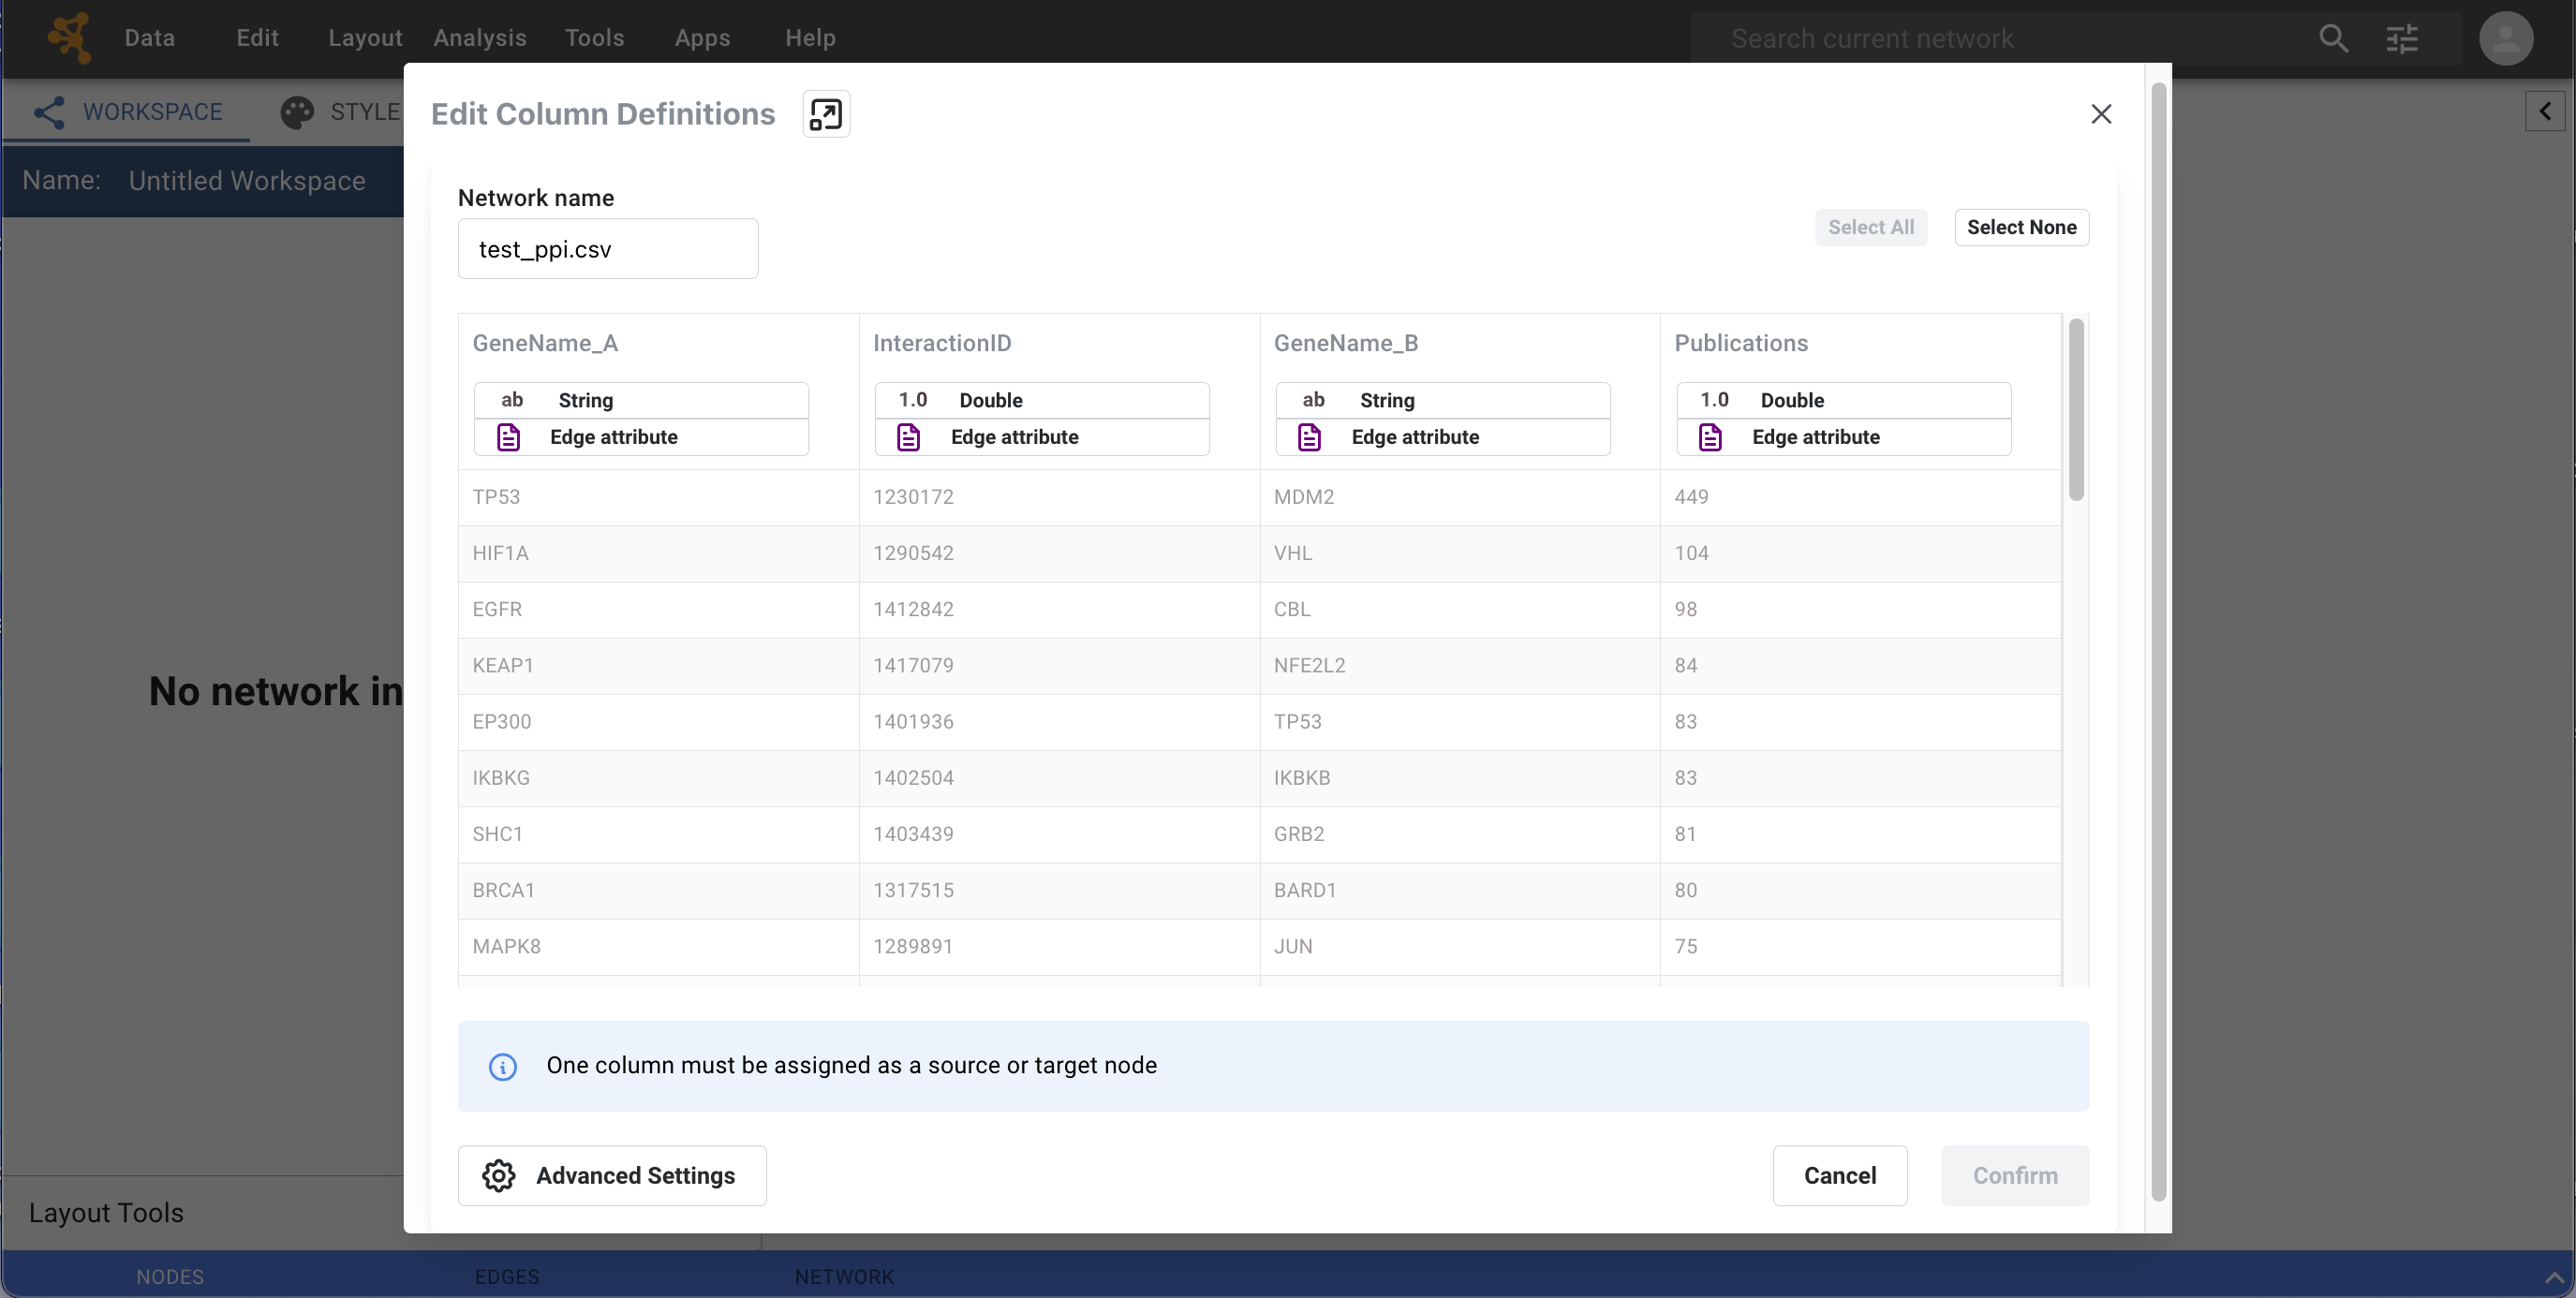
An interactive GUI will be presented as shown in the image below. This interface users to specify parsing options for specified files. The screen provides a preview that shows how the file will be parsed given the current configuration. As the configuration changes, the preview updates automatically. In addition to specifying how the file will be parsed, the user must also choose the columns that represent the source and target nodes as well as an optional edge interaction type. For detailed instructions, see the Basic Operations section below.
The following is a sample network table file:
| source | target | interaction | boolean data | string data | floating point data |
|---|---|---|---|---|---|
| YJR022W | YNR053C | pp | TRUE | abcd12371 | 1.2344543 |
| YER116C | YDL013W | pp | TRUE | abcd12372 | 1.2344543 |
| YNL307C | YAL038W | pp | FALSE | abcd12373 | 1.2344543 |
| YNL216W | YCR012W | pd | TRUE | abcd12374 | 1.2344543 |
| YNL216W | YGR254W | pd | TRUE | abcd12375 | 1.2344543 |
The network table file should contain at least two columns for creating network with edges. If the file has only one column, the created network will not contain any edges. The interaction type is optional in this format. Therefore, a minimal network table looks like the following:
| source | target |
|---|---|
| YJR022W | YNR053C |
| YER116C | YDL013W |
| YNL307C | YAL038W |
| YNL216W | YCR012W |
| YNL216W | YGR254W |
One row in a network table file represents an edge and its edge data columns. This means that a network file is considered a combination of network data and edge attribute data columns. A table may contain columns that aren’t meant to be edge attribute data. In this case, you can choose not to import those columns.
Basic Operations
To import a network from a delimited text table, please follow these steps:
Select Data → Import → Network from File…
Select a file in the file chooser dialog.
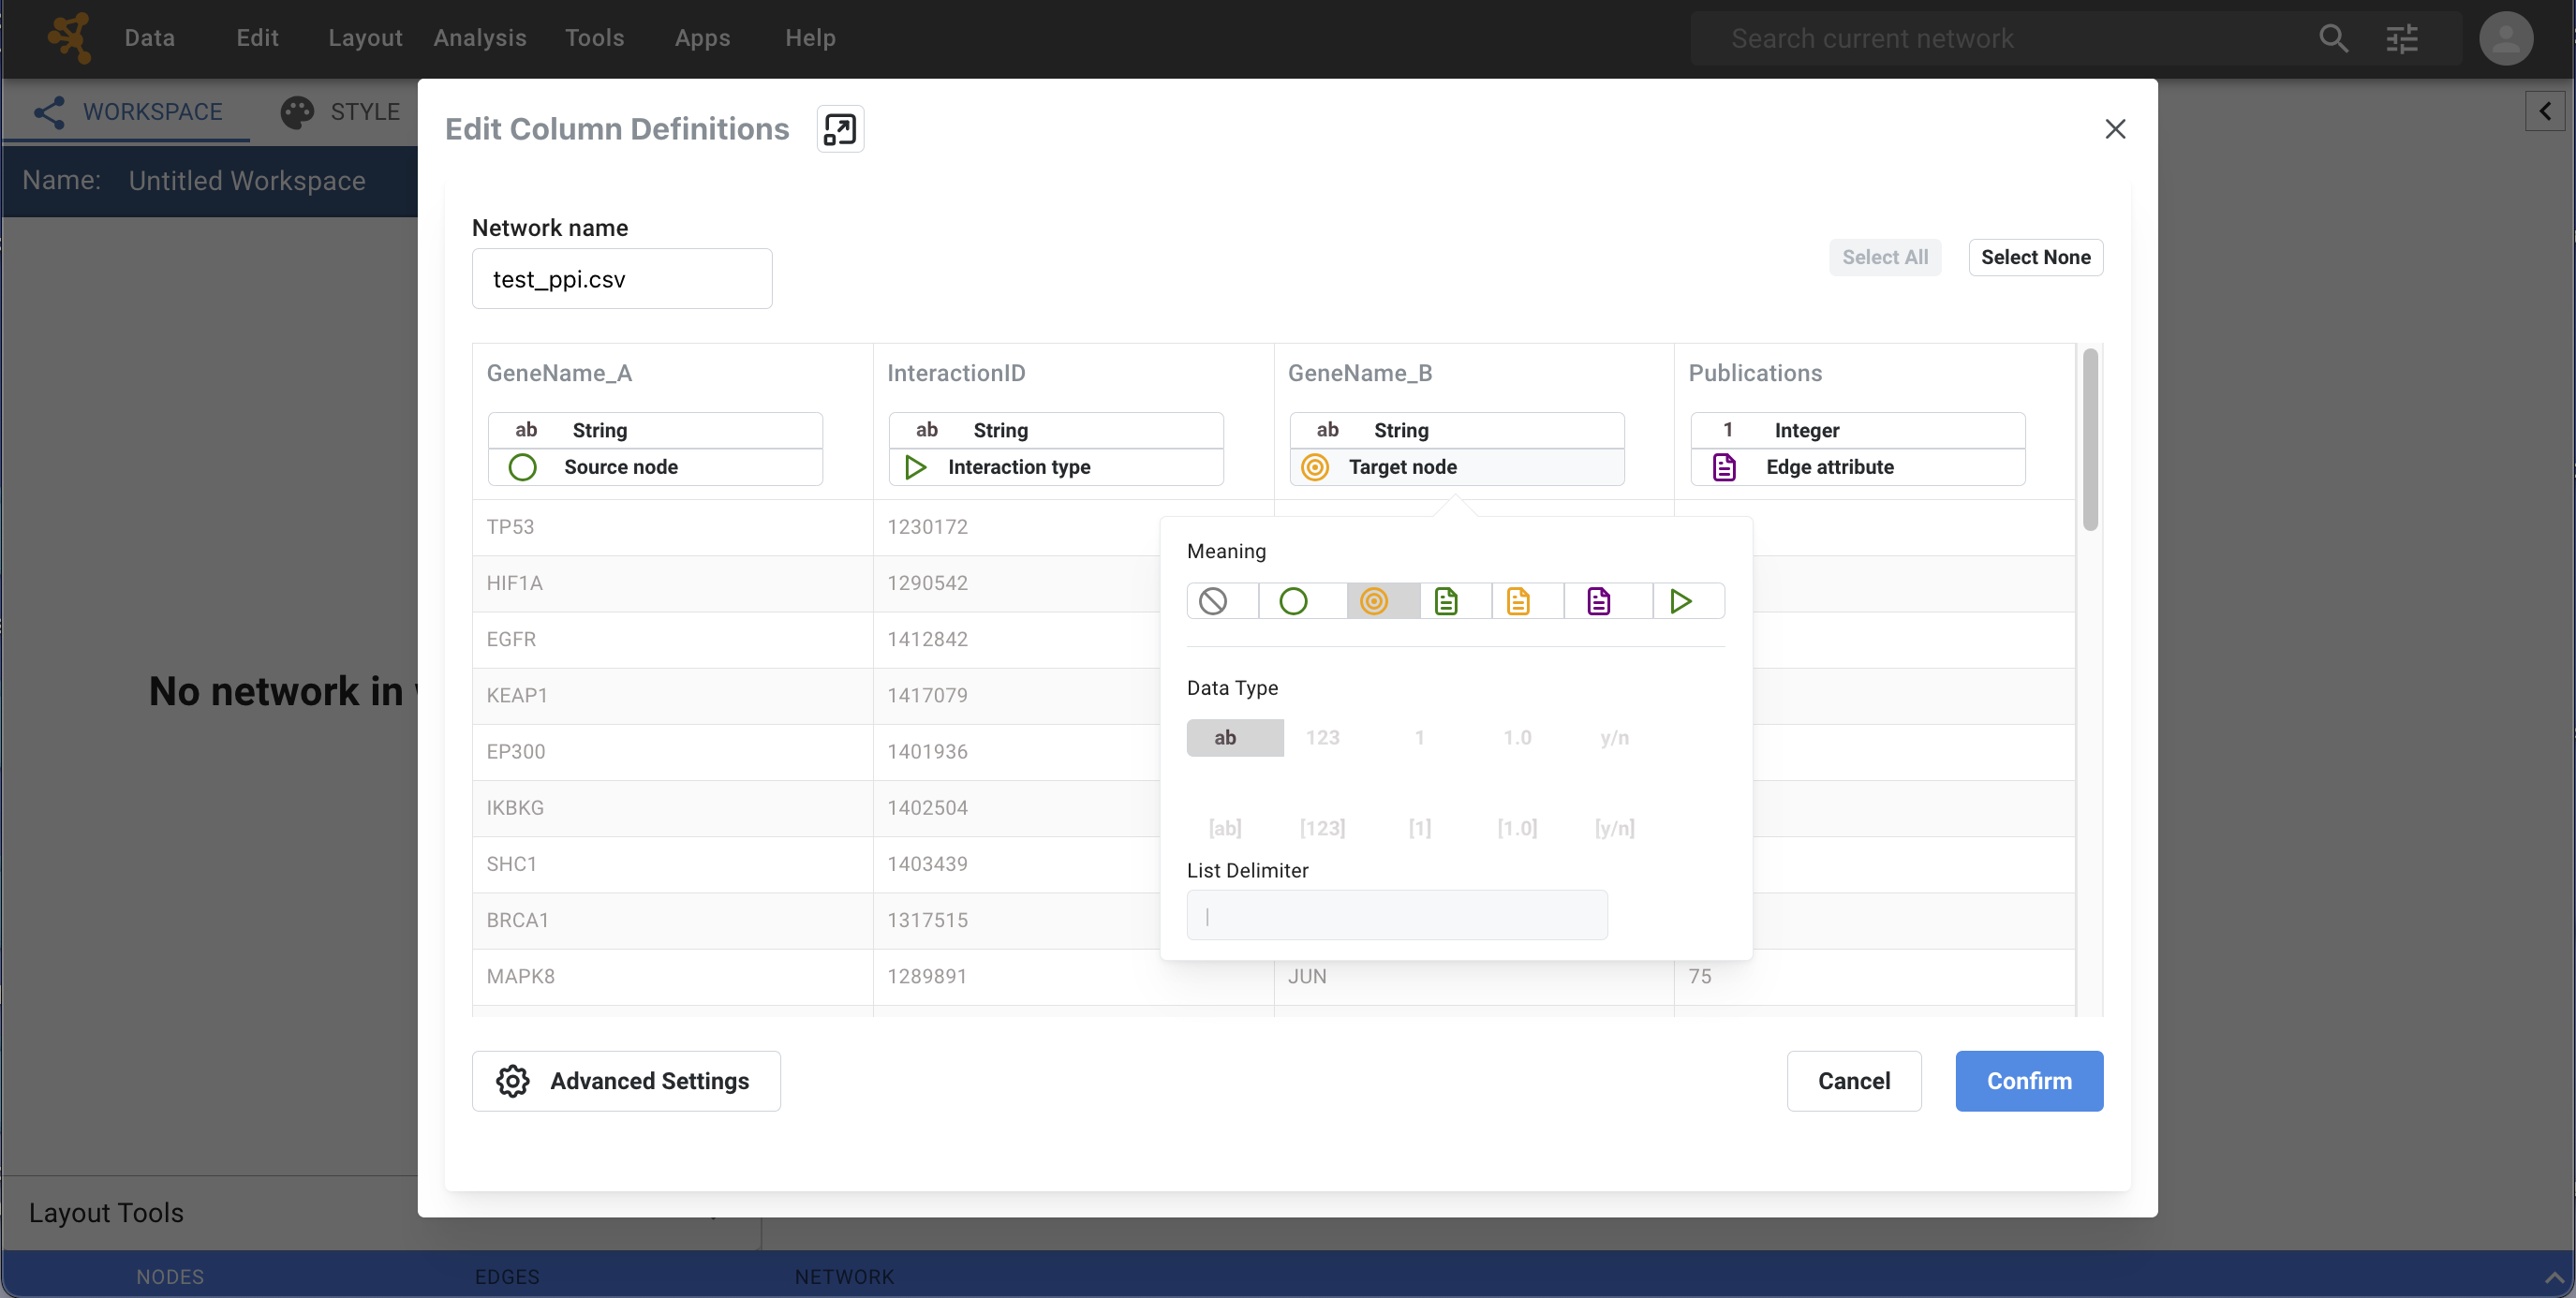
Define the interaction parameters by specifying which columns of data contain the Source Interaction, Target Interaction, and Interaction Type. Clicking on the boxes underneath any column header will bring up the column editor interface for selecting source, interaction and target:
(Optional)
Define node and edge attribute columns, if applicable. Network table files can have node and edge attribute columns in addition to network data. In the screenshot above, the “Pubmed” data column has been defined as an Edge attribute and its data type set to Integer
Enable/Disable Table Columns: You can enable/disable column data by selecting the
 symbol in the
column editor interface.
symbol in the
column editor interface.Change Data Types: Cytoscape has a basic data type detection function that automatically suggests the column data type according to its entries. This can be overridden by selecting the appropriate data type in the column editor. For lists, a delimiter must also be specified (i.e., all cells in the column must use the same delimiter). The following column data types are supported:
String
Boolean (True/False)
Integer
Floating Point (double)
List of (one of) String/Boolean/Integer/Floating Point
Click the blue Confirm button in the bottom right corner to complete the process.
Import a List of Nodes Without Edges
The table import feature supports lists of nodes without edges. If you select only a source column, it creates a network without interactions.
Advanced Settings
The Advanced Settings button allows you to:
Transfer first line as column names: Selecting this option will cause all edge columns to be named according to the first data entry in that column.
Start Import Row: Set which row of the table to begin importing data from. For example, if you want to skip the first 3 rows in the file, set 4 for this option.
3.4. Save to NDEx
Cytoscape Web also allows users to save their networks and worskpaces if they are signed in to their NDEx account. To save a network or workspace to NDEx, choose one of the options available in the Data top menu bar item:
Save Network to NDEx - this option saves your current network by overwriting the existing one in NDEx. In order to use this option, you must either be the network’s owner or have edit permission on it.
Save Copy to NDEx - lets you save a new copy of the current network to your NDEx account. The existing source network will not be modified.
Save Workspace - allows you to overwrite your current workspace in NDEx. This includes not only your networks, but also any installed Apps and registered Service Apps. The very first time you use this option, you’ll be asked to choose a unique name for your workspace.
Save Workspace As… - saves a new copy of the workspace to your NDEx account. When using this option, you must always specify a unique name for the new workspace to be saved.
3.5. Download Network File
Another way to save a network is to download it as a CX2 JSON file by using Data → Download Current Network (.cx2).
CX2 JSON files can be opened in the Cytoscape desktop application, uploaded and stored in NDEx, and accessed programmatically via the NDEx2 Python Client.